Self-Hosted Media Stack: Stream, Manage, and Automate Downloading Media
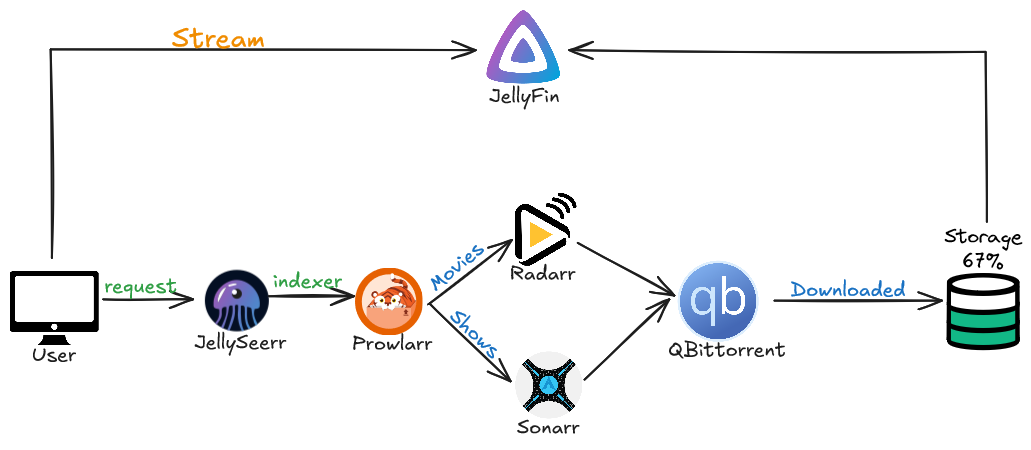
A self-hosted media stack is a powerful setup that allows you to manage, stream, and automate your media content. It includes a variety of applications designed to work together seamlessly for downloading, organizing, and streaming movies and TV shows. This guide explains what each component of the stack does and how they interact with each other.
This guide aims to achieve the below setup using Docker containers. A Docker compose file is used to spin up the containers and create a network for them to interact with each other.
Let’s first see what each component does:
1. Jellyfin#
Jellyfin is an open-source media server that streams your downloaded movies and TV shows to any device. It allows you to organize and view your media in a user-friendly interface.
How it works:#
- Jellyfin organizes your media content into categories such as movies, TV shows, and music.
- It streams media directly to your devices (TV, phone, computer) over your home network.
- Jellyfin integrates with Radarr and Sonarr to automatically update the library with newly downloaded content.
2. Radarr#
Radarr is a movie collection manager for movies. It automates the process of searching for, downloading, and managing your movie collection. Radarr integrates with qBittorrent to download movies when you add them to your library.
How it works:#
- Radarr automatically monitors movies and searches for available torrents via configured indexers.
- It sends requests to qBittorrent to download the movie once a suitable source is found.
- Radarr can also be configured to automatically organize your downloaded movies into specific folders.
3. Sonarr#
Sonarr is a similar tool to Radarr, but it is specifically designed for managing TV shows. It automates the process of searching, downloading, and organizing episodes of your favorite shows.
How it works:#
- Sonarr searches for new episodes and automatically adds them to your download queue.
- Just like Radarr, Sonarr integrates with qBittorrent and manages the download and organization of TV episodes.
- Sonarr can be configured to monitor TV shows and automatically download new episodes as soon as they’re available.
4. Prowlarr#
Prowlarr is an indexer manager that connects to multiple indexers (websites that host torrents) and manages them for both Radarr and Sonarr. Prowlarr can search for content across a wide range of torrent indexers and provides an easy interface for managing them.
How it works:#
- Prowlarr manages and organizes indexers (like Nyaa, Rarbg, etc.) for both Radarr and Sonarr.
- It automatically integrates indexers into both Radarr and Sonarr, so they can use them to search for torrents.
- If VPN is enabled, Prowlarr must use the static IPs for Radarr and Sonarr because they are behind the VPN network.
5. qBittorrent#
qBittorrent is a popular torrent client used for downloading media content. It is lightweight, feature-rich, and easy to use. In this stack, qBittorrent acts as the download manager for both Radarr and Sonarr.
How it works:#
- qBittorrent is the engine that downloads the torrents requested by Radarr and Sonarr.
- It’s controlled via its WebUI, and you can set up authentication to secure access.
- It can be configured to save downloads in specific folders (like /downloads/movies and /downloads/tvshows).
6. Jellyseerr#
Jellyseerr is a fork of Overseerr. It acts as a frontend interface for your Jellyfin media server, allowing you to manage and request media content easily. It integrates with both Radarr and Sonarr to provide a seamless way to request new movies and TV shows.
How it works:#
- Jellyseerr acts as a bridge between your users and your media collection.
- It allows users to request new movies or TV shows, which Jellyseerr adds to Radarr or Sonarr for download.
- Once a movie or show is downloaded, it becomes available for streaming in Jellyfin.
Docker-compose.yml#
version: "3.9"
name: media-stack
services:
  qbittorrent:
    container_name: qbittorrent
    image: lscr.io/linuxserver/qbittorrent:5.0.2
    environment:
      - PUID=1000
      - PGID=1000
      - TZ=UTC
      - WEBUI_PORT=5080
    volumes:
      - qbittorrent-config:/config
      - torrent-downloads:/downloads
    ports:
      - 5080:5080
      - 6881:6881
      - 6881:6881/udp
    restart: "unless-stopped"

  radarr:
    container_name: radarr
    image: lscr.io/linuxserver/radarr:5.15.1
    networks:
      - mynetwork
    environment:
      - PUID=1000
      - PGID=1000
      - TZ=UTC
    ports:
      - 7878:7878
    volumes:
      - radarr-config:/config
      - torrent-downloads:/downloads
    restart: "unless-stopped"

  sonarr:
    image: linuxserver/sonarr:4.0.11
    container_name: sonarr
    networks:
      - mynetwork
    environment:
      - PUID=1000
      - PGID=1000
      - TZ=UTC
    volumes:
      - sonarr-config:/config
      - torrent-downloads:/downloads
    ports:
      - 8989:8989
    restart: unless-stopped

  prowlarr:
    container_name: prowlarr
    image: linuxserver/prowlarr:1.27.0
    networks:
      - mynetwork
    environment:
      - PUID=1000
      - PGID=1000
      - TZ=UTC
    volumes:
      - prowlarr-config:/config
    ports:
      - 9696:9696
    restart: unless-stopped

  jellyseerr:
    image: fallenbagel/jellyseerr:2.1.0
    container_name: jellyseerr
    networks:
      - mynetwork
    environment:
      - PUID=1000
      - PGID=1000
      - TZ=UTC
    volumes:
      - jellyseerr-config:/app/config
    ports:
      - 5055:5055
    restart: unless-stopped

  jellyfin:
    image: linuxserver/jellyfin:10.10.3
    container_name: jellyfin
    networks:
      - mynetwork
    environment:
      - PUID=1000
      - PGID=1000
      - TZ=UTC
    volumes:
      - jellyfin-config:/config
      - torrent-downloads:/data
    ports:
      - 8096:8096
      - 7359:7359/udp
      - 8920:8920
    restart: unless-stopped

volumes:
  torrent-downloads:
  radarr-config:
  sonarr-config:
  prowlarr-config:
  jellyfin-config:
  qbittorrent-config:
  jellyseerr-config:

networks:
  mynetwork:
    external: true
To deploy the stack , Run below command.
docker compose up -d
Setting Up and Configuring Your Self-Hosted Media Stack#
In this section, we will walk you through how to set up and configure the different components of your media stack. The main components we will configure are:
- qBittorrent for downloading media files
- Radarr and Sonarr for automating movie and TV show downloads
- Jellyfin for streaming media
- Jellyseerr for managing media requests
- Prowlarr for managing indexers and providing content to Radarr and Sonarr
Let’s break it down step-by-step.
1. Configure qBittorrent#
qBittorrent is your torrent client, and it will be responsible for downloading your media files. To configure it:
a. Access qBittorrent Web UI#
- Open a browser and go to
http://localhost:5080. - The default username is
admin. - To find the temporary password, run the following command to check the container logs:
docker logs qbittorrent
b. Change the Default Password#
- Once logged in, go to Tools -> Options -> Web UI.
- Change the password to something more secure.
c. Set Up Download Folders#
- Now, let’s set up the folders where qBittorrent will store your downloaded media files. Run the following commands on the server:
docker exec -it qbittorrent bash # Get inside qBittorrent container
# Above command will get you inside qBittorrent interactive terminal, Run below command in qbt terminal
mkdir /downloads/movies /downloads/tvshows
chown 1000:1000 /downloads/movies /downloads/tvshows
This creates two directories:
/downloads/moviesfor your movie downloads/downloads/tvshowsfor your TV show downloads
2. Configure Radarr#
Radarr is responsible for automating the download and organization of movies. Here’s how to set it up:
a. Access Radarr#
- Open a browser and go to
http://localhost:7878to access the Radarr interface.
b. Configure Media Management#
- Go to Settings -> Media Management.
- Check the option “Movies deleted from disk are automatically unmonitored in Radarr” under the File management section.
- Scroll down and add a Root Folder by clicking Add Root Folder and choosing
/downloads/movies.
c. Configure Download Client (qBittorrent)#
- Go to Settings -> Download Clients.
- Click Add Client and select qBittorrent.
- Enter the following information:
- Host:
qbittorrent - Port:
5080 - Username:
admin - Password: The password you set earlier
- Host:
- Click Test to make sure the connection works, then Save.
d. Enable Authentication#
- Go to Settings -> General.
- Enable Advanced Settings and select Authentication.
- Set up a username and password for additional security.
3. Configure Sonarr#
Sonarr is similar to Radarr but for TV shows. To configure Sonarr:
a. Access Sonarr#
- Open a browser and go to
http://localhost:8989.
b. Configure Media Management#
- Go to Settings -> Media Management.
- Add a Root Folder pointing to
/downloads/tvshows.
c. Configure Download Client (qBittorrent)#
- Go to Settings -> Download Clients.
- Select qBittorrent and enter the same details as Radarr:
- Host:
qbittorrent - Port:
5080 - Username:
admin - Password: The password you set earlier.
- Host:
- Click Test and then Save.
4. Configure Prowlarr#
Prowlarr manages the indexers that Radarr and Sonarr use to find and download content. Here’s how to configure Prowlarr:
a. Access Prowlarr#
- Open a browser and go to
http://localhost:9696.
b. Set Up Authentication#
- Go to Settings -> General -> Authentication.
- Enable Authentication and create a username and password.
c. Add Indexers#
- Go to Indexers -> Add Indexer.
- Choose an Indexer (e.g., Jackett, NZBHydra2, etc.), enter the base URL of the indexer, and click Test to make sure it’s working. Then, click Save.
d. Add Applications (Radarr and Sonarr)#
- Go to Settings -> Apps -> Add Application.
- Select Radarr and enter:
- Prowlarr server URL:
http://prowlarr:9696 - Radarr server URL:
http://radarr:7878 - API Key: Found in Radarr’s settings.
- Click Test and then Save.
- Prowlarr server URL:
- Do the same for Sonarr, entering:
- Sonarr server URL:
http://sonarr:8989 - API Key: Found in Sonarr’s settings.
- Click Test and then Save.
- Sonarr server URL:
5. Configure Jellyfin#
Jellyfin is your media server that will stream your movies and TV shows to various devices. Here’s how to configure it:
a. Access Jellyfin#
- Open a browser and go to
http://localhost:8096. - When accessing Jellyfin for the first time, a guided configuration will appear. Just follow the steps to complete the setup.
b. Add Media Library#
- During the setup process, you’ll be prompted to Add Media Library.
- Choose /data/movies/ as the media folder for your movie library.
6. Configure Jellyseerr#
Jellyseerr is a media request system that integrates with Jellyfin, Radarr, and Sonarr. Here’s how to set it up:
a. Access Jellyseerr#
- Open a browser and go to
http://localhost:5055. - When accessing Jellyseerr for the first time, a guided configuration will guide you through the setup process. Follow the steps and provide the necessary details about your Radarr and Sonarr setups.
b. Follow the Jellyseerr Setup Documentation#
- For a more detailed setup, you can follow the Jellyseerr documentation, as Jellyseerr is a fork of Overseerr.
With these steps completed, your self-hosted media stack is now configured and ready to automate media management, downloading, and streaming. You’ll be able to search for movies and TV shows, automatically download them, and stream them to your devices — all while ensuring your privacy and security through the use of a VPN.
Using Jellyseerr to Request Media#
a. Access Jellyseerr#
- Open a browser and go to
http://localhost:5055.
b. Request a Movie or TV Show#
Once Jellyseerr is set up:
- On the main dashboard, you’ll see options to Search for a movie or TV show.
- Use the Search bar to find the title you want.
- Once you find your movie or TV show, click on it, and you’ll see options to Request it.
- Select the quality profile you want, and click Request.
c. Automated Download Process#
- After you request a title, Jellyseerr sends the request to Radarr (for movies) or Sonarr (for TV shows).
- Radarr or Sonarr will then handle the downloading and organizing of the requested media.
- You can check the progress of your request in the Activities section of Jellyseerr.
d. Manage Requests#
- If you need to cancel or view the status of your requests, go to the Requests tab in Jellyseerr.
- Here, you can see which requests are queued, downloading, or completed.
Streaming with Jellyfin#
After setting up your media stack and configuring all the components, Jellyfin serves as your personal media server where you can enjoy all your content.
Using Jellyfin#
- Open Jellyfin at
http://localhost:8096. - You can add your movies and TV shows by selecting the appropriate folders (e.g.,
/data/movies/for movies). - Once your libraries are set up, you can start streaming your content directly from the Jellyfin web interface, or use any supported device, such as smart TVs, mobile apps, or streaming boxes.
Jellyfin is fully customizable and lets you organize, stream, and share your media on your terms—without relying on third-party services.
By combining tools like Radarr, Sonarr, Jellyseerr, and Jellyfin, you’ve built a robust self-hosted media stack that lets you automatically download, organize, request, and stream your media content. Enjoy your personal, on-demand streaming service!